Arc welding results
I’ve gone to three of these welding classes so far. The first one was just introductory stuff, but in the second and third we’ve gotten to do some real work. The class starts out with traditional shielded metal arc welding — what people are usually referring to when they just say “arc welding”, where you have a consumable electrode that melts to supply the filler metal, and which is coated with a solid flux that burns to create shielding gas. It’s what the second guy in this post is doing. It’s fairly simple from a technological standpoint — just run 70-150 amps at maybe 40vDC through your electrode, strike it along the surface of the workpiece to ignite the arc, and get going. I understand that if you’re not doing anything too complicated, you can actually SMAW weld in a pinch with a couple of car batteries and jumper cables.
On the other hand, the proper technique is quite tricky, because you have to keep the electric arc at a steady length of about 1/8″ to get even heating…but the electrode is constantly melting to supply filler metal, increasing the length of the arc, so you have to steadily move closer to the workpiece. Get too far and the arc sputters and the weld fails, too close and you’ll fuse the electrode to the workpiece and short-circuit the machine. You have to keep the electrode at the proper angle even as it’s burning and you’re moving to maintain a good gas shield and steady arc performance. And to top it off, you can’t stop moving; as long as the arc is active, you’re dumping energy and depositing filler metal, so stay in one place too long and you’ll get a big nasty blob or melt a hole clean through to the floor.
But man it’s a lot of fun! Watching that 10,000° 100-amp arc roaring away, liquefying steel in seconds, is just too cool for words. And when you finish a weld and flip up the shield and the steel is glowing like a lightbulb from the heat…awesome.
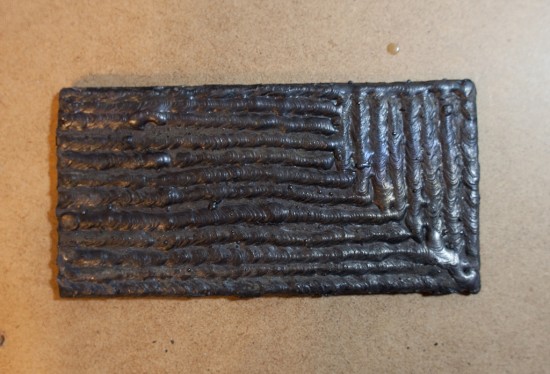
Anyway, this was the second week’s exercise:
Just take a flat plate and run weld beads along it in a pattern, trying to keep the arc steady and the line straight, and learning how to leave off and pick up a bead again when the electrode burns out. I actually did this wrong. As it turns out you’re supposed to blend one weld into another, making the whole plate thicker, not build cornrows like I did. Apparently this is a common technique, though, when you need a thicker piece of steel than you have available: run welds along the whole upper surface until it’s thickened up, then mill the plate back down to a smooth surface. Odd concept but I guess it’s a good solution.
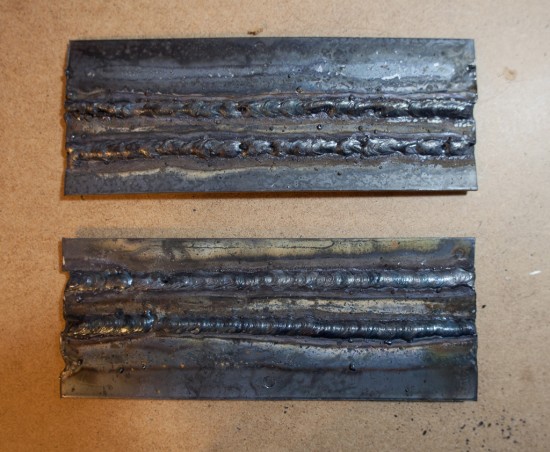
So, I made a bunch of plates like that, some with the proper blends. Last week was lap joints — overlapping several plates like a stair-step, then welding them together along the edges. Here’s the first, amazingly ugly, attempt at that:
Gross. Look at all those problems! The little arrowhead-shaped weld pools are from moving too fast, the excessive spatter and cratering is from too-high current, the thin spaghetti sections with no penetration are from an overly long arc. Some of it was also related to clamping the work piece at a poor angle, so the metal didn’t quite run where it was supposed to. The bottom plate is getting a little better, but there were still some nasty problems starting the arc (turned out to be an old, moist electrode) and nasty spots at the edge where I melted clean through.
Try, try again:
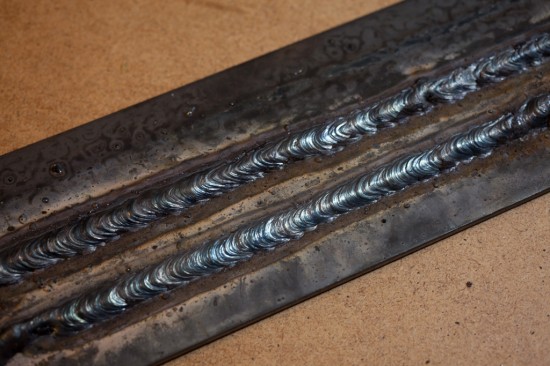
Getting a little closer. On the top piece you can see there were some bad attempts at picking up a solidified bead with a new electrode, and I moved a little too fast, but overall these had the right amount of penetration and were at least continuous. Not pretty though. SMAW welds will never be as pretty as a good TIG weld, what with all the scorching and spattering from the flux, though a lot of the dirt and gunk you see in the above shots would clean off nicely with a wire brush. Flux scorching aside, the ultimate goal is to get that sort of “stack of nickels” look of a really high quality weld, where each step is evenly round and aligned perfectly with the previous one. By the end I was starting to get the hang of it, I think:
Certainly not professional, but I’m pretty happy with those and with some cleaning they’d be okay for something non-cosmetic. Practice makes perfect!
Looking forward to next week…it’s always gratifying to learn new skills.


Those last couple are looking good!
A lot of welding instructors will start you out with tricky rods (like 6015’s) that highlight areas of technique in need of improvement, if you want a more consistent and cosmetically appealing weld then try a 6011 rod (or any rod rated for use with AC sources, they tend to be more forgiving). The tensile strength might not be the same, but a good 6011 weld will be stronger than a shitty 6015 weld any day.